I had some trouble at first deciding what do to my project on. I knew I wanted to do something science related because that's what I teach, but I couldn't decide what direction to take. As I went through the Nature Scapes bundle, I came across the scape with all of the leaves changing color and thought of all of the science that goes into the changing of seasons. Then I tried to think of other aspects of science in addition to the Chemistry that I'm more comfortable with. So that's where the hibernating, migrating, and adapting animals came to my mind. Finally, I thought of all of the talk lately about flu shots and the science that goes into them.
I started by making the prims for the floor of the scape with the fall leaves texture and then put the large buildings on top. At first I tried just eyeballing them and lining them up that way...that didn't last long. Eventually, I got pretty good at using the X, Y, and Z coordinates to size and position the prims so that they lined up better. Once the large buildings were built, I searched for free textures that looked rustic and fall-ish.

The building above is the elevated building. I hollowed out a cylinder and cut a path so that there was an entrance. The roof for this one is a cone that I made a little bigger than the cylinder with the X, Y coordinates for size. The stairs to this building allowed me to use a new skill that I learned while searching for building tips online...the 'copy selection' option in the build menu. I was able to select this option and then just click on the edge of the prim I wanted to copy and the new prim would appear perfectly lined up with the original. I only had to position the very top stair and the rest I was able to 'copy selection' and then add a texture. So easy! Minus the frustration of lining everything up! ;-) Below is a pic of me building the stairs.
The other two buildings were a little more difficult because they were more prims. The welcome sign was also made at this time and a rotation script was added.
With the basics of the buildings done and the textures selected, I went and found door textures and made doors for each. I had trouble getting the door to pivot in the right spot on its own, so I made a tall thin rectangular prim to give the script to and then link it to the door prim. This 'hinge' made the doors work the way I had intended. The next prims I made were for the educational URL's and media. I selected elements in several forms (article, website, video) to keep visitors engaged. The questions for the welcome notecard were made at this time.
Once the large buildings were done and educational elements were added, I went 'shopping'. Most of what I found was free, but I guess you'd still call it shopping. I found Sky High Freebies...SO much free stuff to choose from! And big things too! I just kept adding more and more to my inventory just in case I found a need for it.
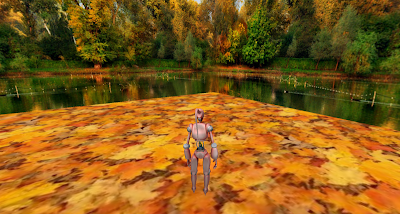
After shopping, I went back to my scape and started adding elements of
immersion. See pictures below of my completed scape. Do you feel like
you're in a fall scape?
I added the barrels in the picture above because I didn't want visitors to fall off the edge of my scape. I kept feeling like I was going to fall out since the walls let you through. I added them one at a time on one of the edges and then linked, 'shift' copied, and rotated them to get the other edge.
The flag you see in this picture was one of the last things that I added. I made the pole first and then used the 'copy selection' option to make another cylinder that lined up exactly with the first. I then made the second cylinder wider and shorter to make the base. I also tapered the top of the base and gave it a concrete texture. Making the flag itself gave me an opportunity to change the flexible path settings. It took me a little bit to figure it, but I feel like I got something that resembles a flag in some kind of motion.
I thought the bear rug and fire place (with tools) added very rustic elements to this room.
I thought the book shelves and couches (and the cot and doctor's bench next to it) were things that gave a doctor's office feel.
The places to sit in this learning center were rustic fall colors. I used the website that is linked to this room to make the Tagxedo wall hanging behind the couch. Also in fall colors.
This project was challenging. At times it was overwhelming to think of all of the things that I wanted/needed to do. Once I had that all worked out though, it was hard to stop adding elements! I was able to use all of what I've learned in CED 551 and add some new skills that I discovered along the way. I hope you enjoy my Science of Fall Scape!


No comments:
Post a Comment